How to Rig a Slip Bobber for Panfish
It can be incredibly frustrating when you know those panfish are holding deep, maybe nestled down in a brush pile or suspended just off a drop-off, and your traditional clip-on bobber just isn't cutting it. Trying to cast a fixed bobber with a long leader is a guaranteed tangle, and it feels like you're constantly fighting your gear instead of fishing. But don't worry, there's a simple, elegant solution that will revolutionize your panfish game: the slip bobber. This guide will walk you through everything you need to know about rigging a slip bobber for panfish, making those deeper fish much more accessible.
Why a Slip Bobber is Your Best Friend for Panfish
If you've spent any time on the water chasing bluegill, crappie, or even yellow perch in Nebraska, you've likely encountered situations where the fish just aren't near the surface. Maybe it's the heat of summer pushing them into cooler, deeper water, or the cold of early spring keeping them hunkered down. A fixed bobber, while great for shallow water, becomes a real pain when you need to fish more than a couple of feet deep. The line snags on every cast, and the bobber itself makes it impossible to reel in past a certain point. It feels like you're constantly compromising.
Beyond the Basics: Fixed vs. Slip Bobbers
Think about the traditional red-and-white bobber you might have used as a kid. You squeeze a clip, attach it to your line, and that's where it stays. Simple, effective for shallow ponds where the fish are active near the surface, and frankly, iconic. But that simplicity turns into a hindrance when the fish decide to move deeper. You can only set your bait so far below that bobber before casting becomes an absolute nightmare, often leading to your bait and hook getting tangled in the line above the bobber. It's a rite of passage for many anglers, but also a source of head-scratching frustration when you want to get serious about panfish.
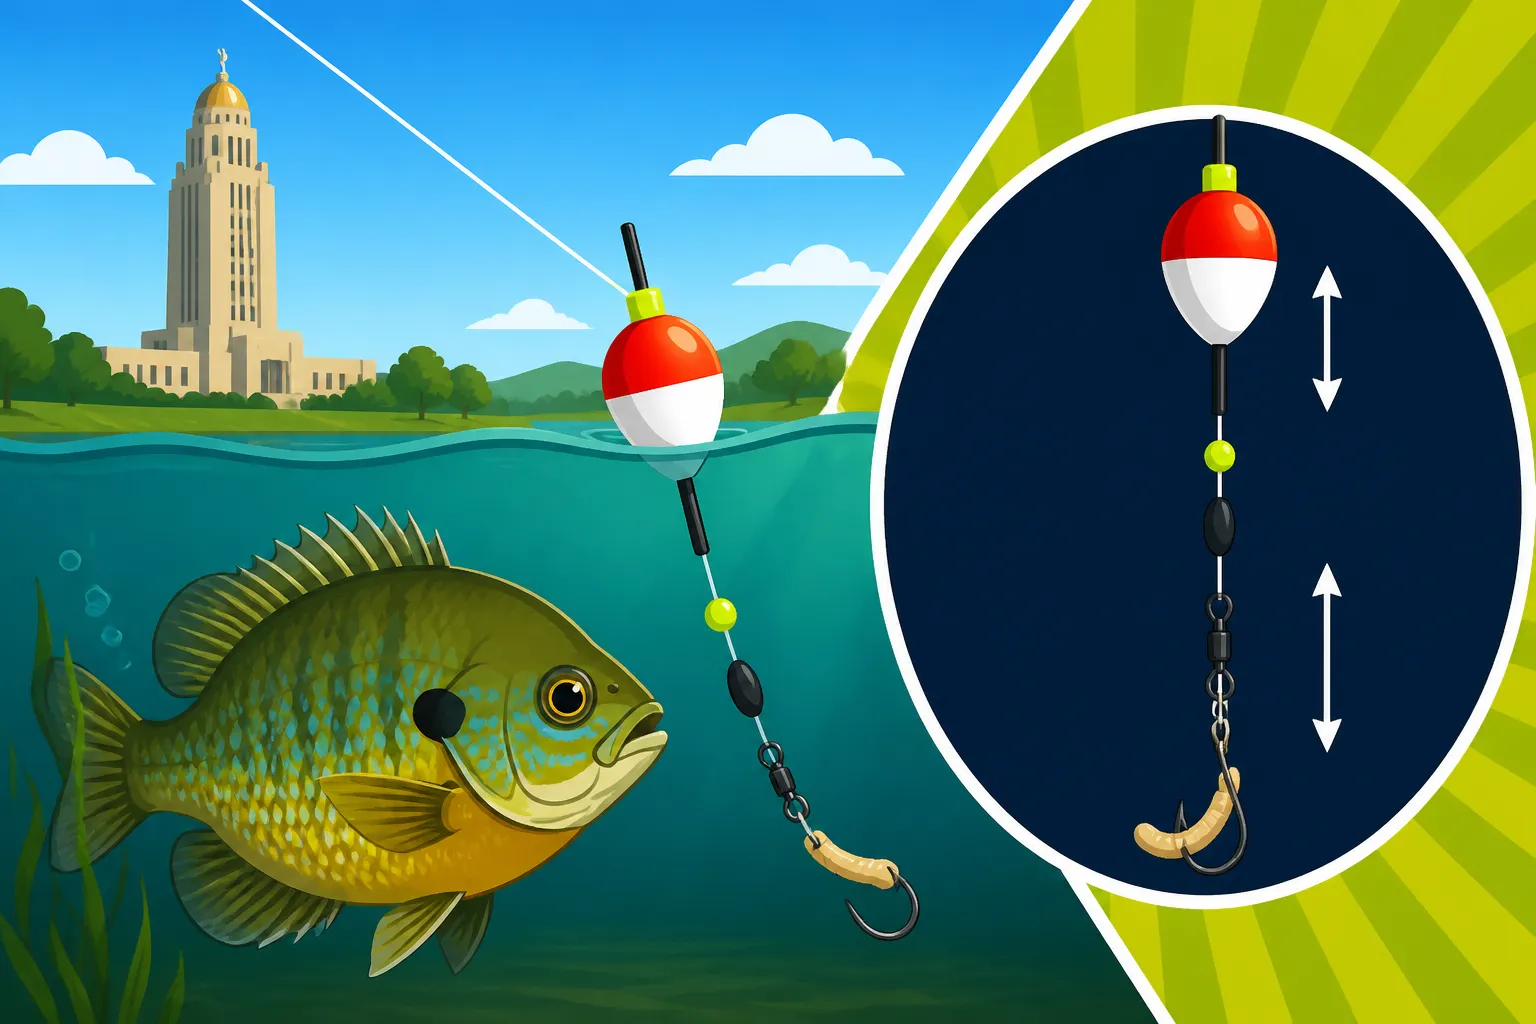
A slip bobber, on the other hand, is a game-changer. Instead of clipping onto your line, it "slips" or slides freely up and down your main line. The magic happens with a small knot, called a bobber stop, which you place on your line to determine the maximum depth your bait can fall. This means you can cast with the bobber right down by your weight, making for a much smoother, longer cast, and then it slides up the line until it hits that bobber stop, perfectly presenting your bait at your desired depth. It's like having a superpower for depth control!
Reaching Deeper Waters with Ease
This ability to effectively fish deeper water is where the slip bobber truly shines for panfish. Imagine you're at a popular spot like Branched Oak Lake, and crappie are stacked in 15 feet of water around some submerged timber. With a fixed bobber, you'd struggle mightily to get your bait down there. But with a slip bobber, you can easily set your depth to 15 feet, cast your tiny jig or minnow, and watch it gracefully descend to the strike zone. The bobber then floats, giving you clear indication of any bites without fighting the drag of a long, unwieldy leader during the cast.
This also makes it fantastic for targeting species like yellow perch, which often hold closer to the bottom, or for those finicky bluegill that might be suspended just above the thermocline in summer. It's not just about depth, but about precise depth control, allowing you to present your bait exactly where the fish are holding, without having to re-rig your entire setup every time you want to try a new depth. This versatility is why many experienced anglers consider it an indispensable tool, especially when exploring different areas or when the fish's habits change throughout the day.
Gathering Your Essential Slip Bobber Components
Before we start tying knots, let's talk about the gear you'll need. Don't worry, it's nothing overly complicated or expensive, and most of these items are readily available at any tackle shop or even online through retailers like Amazon. Having the right components makes a huge difference in both the ease of rigging and the effectiveness of your setup.
The Bobber Itself: Choosing the Right Style
Slip bobbers come in a variety of shapes and sizes, and choosing the right one can impact your fishing experience. For panfish, you generally want something fairly sensitive but still visible. Thinner, pencil-style bobbers are excellent for detecting light bites, especially from finicky crappie or bluegill, as they offer minimal resistance to the fish. Oval or pear-shaped bobbers are also popular, providing a bit more buoyancy for slightly heavier baits or in choppy conditions. The key is to match the bobber's buoyancy to the weight of your bait and sinkers. You want it to float upright, with just enough tip showing to detect a bite, but not so much that it feels like a billboard to the fish.
Consider the size too. A large bobber might seem easier to see, but it can also be too cumbersome for light panfish tackle and create too much resistance for a subtle bite. For most panfish, a smaller to medium-sized slip bobber, perhaps 1/4 to 1/2 inch in diameter, is usually sufficient. Remember, the goal is stealth and sensitivity. You can find excellent multi-packs of various sizes on Amazon, which is a great way to stock up and find your preferred style.
The Stopper and Bead: Small but Mighty
These two tiny components are absolutely critical to the slip bobber's function. The bobber stop is a small piece of string or rubber that you cinch onto your main line. Its purpose is to physically stop the slip bobber from sliding further up your line than your desired depth. Without it, the bobber would simply slide all the way to your rod tip. These stops are often sold pre-tied with a plastic sleeve, making them very easy to install. They can be adjusted up or down the line to change your fishing depth, and they're small enough to reel right through your rod guides, allowing for those long casts.
Just below the bobber stop, you'll need a small plastic bead. This bead serves as a buffer between the bobber stop and the bobber itself. The eye of the slip bobber is usually too large for the bobber stop knot to catch reliably, so the bead creates a solid surface for the bobber to rest against. Make sure the bead is large enough so it won't pass through the bobber's eye, but not so big that it impedes casting or feels clunky. Again, these beads are inexpensive and often come in packs with bobber stops. You'll find that these small parts are vital for any successful slip bobber setup.
Weights and Hooks: Matching Your Bait and Target
The size of your weight (sinker) and hook will largely depend on the panfish species you're targeting and the bait you're using. For bluegill and smaller crappie, a tiny split shot or two, just enough to get your bait down, is often all you need. If you're using a small jig, the jig's weight might be sufficient on its own. For larger crappie or if you're battling some wind or current, a slightly heavier sinker, like a small bullet weight or an egg sinker, might be necessary. The goal is just enough weight to allow your bait to sink naturally and keep your line relatively taut, allowing the bobber to stand upright and signal bites.
When it comes to hooks, think small. Panfish have small mouths, so a size 6, 8, or even 10 hook is typically perfect for live bait like wax worms, maggots, or small minnows. If you're fishing with a jig, choose a jig head appropriate for the size of the panfish and the bait you're tipping it with. Circle hooks are also a great option, as they often result in hooks being set in the corner of the fish's mouth, making for easier, safer release if you're practicing catch and release. Remember to match your hook size to your bait to ensure natural presentation. Getting the right size is crucial for successful fishing, and you'll find a wide variety of these on Amazon.
Line Selection: What Works Best
For panfish, lighter line is almost always better. It's less visible to the fish, allows for more natural bait presentation, and is more sensitive, helping you feel those subtle bites. A good monofilament line in the 4-6 pound test range is a fantastic all-around choice. It has a bit of stretch, which can be forgiving when a fish makes a sudden run, and it's easy to tie knots with. Fluorocarbon line is another excellent option; it's nearly invisible underwater and has less stretch than mono, offering even more sensitivity. However, it can be a bit stiffer and sometimes harder to tie.
Braided line in similar pound tests can also be used, especially if you want maximum sensitivity and strength for its diameter, but it's often more visible and can make tying some knots trickier. Ultimately, for most panfish scenarios with a slip bobber, a good quality 4-pound monofilament or fluorocarbon line will serve you well. Consider a good quality line from a trusted brand to ensure reliability.
Your Step-by-Step Guide to Tying the Perfect Rig
Alright, let's get down to business! Rigging a slip bobber is surprisingly simple once you understand the order of operations. It might seem like a lot of steps at first, but with a little practice, you'll be able to tie one of these setups quickly and efficiently, getting your bait into the strike zone faster.
Securing Your Bobber Stop
The very first thing you'll do, even before putting on your bobber, is attach your bobber stop. Most bobber stops come on a small plastic sleeve with a loop. You'll simply pass your main fishing line through this loop. Then, slide the bobber stop knot off the plastic sleeve and onto your main line. Once it's on your line, you can gently pull both ends of the bobber stop knot to cinch it down, but don't overtighten it just yet. You want it snug enough to hold its position but still movable so you can adjust your depth later.
It's helpful to wet the knot a little before cinching to ensure it slides smoothly and tightens without causing friction damage to your line. This little knot is what allows your bobber to "slip" and then stop at your desired depth. Without it, your entire setup becomes just a complicated fixed bobber. Some anglers even tie their own bobber stops from a small piece of string or dental floss, but the pre-made ones are incredibly convenient and reliable.
Adding the Bead and Bobber
Once your bobber stop is securely on your main line, the next step is to add that crucial bead. Simply thread your main line through the hole in the plastic bead. This bead should sit directly below your bobber stop. Its purpose, as we discussed, is to create a solid surface for the slip bobber to rest against. It prevents the tiny bobber stop knot from pulling through the eye of the slip bobber itself.
Immediately after the bead, you'll thread on your slip bobber. Most slip bobbers have a small wire or plastic eyelet at the bottom; thread your main line through this eyelet. At this point, you'll notice that the bobber can slide freely up and down your line, stopping only when it hits the bead, which in turn hits the bobber stop. This free-sliding motion is the core principle of the slip bobber rig, allowing you to cast much more easily.
Attaching Your Weight and Hook
With the bobber stop, bead, and bobber all in place, you're ready to complete the business end of your rig. First, attach your weight(s). This could be a single split shot, a series of smaller split shots, or a small sliding sinker. If using a sliding sinker, make sure it can move freely on your line, or use a small swivel below it to prevent it from sliding all the way down to your hook. The amount of weight depends on your bait and fishing conditions, but remember, just enough to get your bait down and make your bobber stand correctly.
Finally, tie your hook or jig to the very end of your main line. Use a reliable knot, like a Palomar knot or an improved clinch knot, to ensure a strong connection. If you're using live bait, make sure your hook size is appropriate for the bait and the panfish you're targeting. For artificials, your jig head should be tipped with your chosen plastic or bait. This completes the physical rigging of your slip bobber setup.
Setting Your Depth: The Crucial Step
Now comes the moment of truth: setting your fishing depth. This is where the beauty of the slip bobber truly shines. To adjust your depth, simply slide the bobber stop knot up or down your main line. If you want to fish deeper, slide the bobber stop further away from your hook. If you want to fish shallower, slide it closer. You can measure the distance with a tape measure or by counting rod lengths if you're estimating.
A great tip for beginners is to start by setting your depth to roughly half the water depth you expect to be fishing. For instance, if you're in 10 feet of water, start at 5 feet. Then, observe your bobber. If it's too shallow, your bait might not be reaching the fish. If it's too deep, your bait might be dragging on the bottom, or your bobber might be lying flat. Adjust incrementally until your bobber stands perfectly upright, and you start getting bites. This precise control allows you to quickly adapt to where the fish are holding, whether they're suspended, near the bottom, or along specific structures like those in a good crappie spot.
| Component | Purpose | Key Considerations for Panfish |
|---|---|---|
| Bobber Stop | Sets the maximum depth the bobber can slide. | Small, easily adjustable, secure. |
| Bead | Prevents the bobber stop from entering the bobber's eye. | Large enough not to pass through bobber. |
| Slip Bobber | Indicates bites, allows free-sliding action. | Sensitive, visible, matches bait weight. |
| Weight | Sinks bait to desired depth, helps with casting. | Minimal, matched to bait and conditions. |
| Hook/Jig | Attaches bait and catches fish. | Small (size 6-10), sharp, appropriate for bait. |
| Fishing Line | Connects all components to your rod and reel. | Light (4-6 lb test), low visibility, sensitive. |
Mastering the Art of Panfish with a Slip Bobber
Rigging the slip bobber is just the first step; learning how to effectively fish with it is where the real magic happens. Panfish, like bluegill, crappie, and perch, are often found in various depths and habitats, and the slip bobber is your perfect tool for adapting to their behavior.
Bait and Presentation: What Panfish Crave
Panfish aren't usually picky eaters, but presentation still matters. For live bait, small minnows (especially for crappie), wax worms, red worms, and maggots are perennial favorites. Thread your bait onto the hook carefully, ensuring it looks natural and can move freely. If you're targeting crappie around brush piles, a tiny jig tipped with a minnow or a small plastic grub can be incredibly effective. Consider checking out our guide on the Best Bait for Bluegill and Sunfish for more specific ideas. The key is to use bait that is appropriately sized for their small mouths and to present it in a way that is enticing and natural.
When using a slip bobber, the controlled descent of your bait is a huge advantage. Instead of just dropping straight down, a lightly weighted bait under a slip bobber will slowly flutter or glide, mimicking injured prey, which can often trigger a strike from hesitant panfish. Experiment with slight twitches or slow retrieves to impart action to your bait. Sometimes, just letting it sit perfectly still is all it takes, especially when fish are suspended.
Reading the Bite: Subtle Nods and Full Dips
One of the joys of bobber fishing is watching for that tell-tale sign of a bite. With a sensitive slip bobber, you'll learn to distinguish between a subtle "nod" from a curious fish and a definitive "dip" that signals a committed take. For panfish, bites can often be incredibly light, especially in colder water or when they're being finicky. A slight dimple on the surface near your bobber, or a very slow, deliberate submergence, often means a bluegill is mouthing your bait.
A quick, decisive dip or sideways movement usually indicates a more aggressive bite, common with hungry crappie or perch. Don't be too quick to set the hook on every little twitch; sometimes, it's best to let the fish take the bait fully before reeling in the slack and setting the hook with a gentle upward sweep. If you're not getting bites but suspect fish are there, try adjusting your depth by six inches or a foot at a time. This fine-tuning is often the difference between a slow day and a successful outing.
Adjusting to Conditions: Wind, Depth, and Cover
The beauty of the slip bobber is its adaptability. On a windy day, a slightly heavier weight will help your bait get down quicker and stay put, reducing the amount your bobber gets blown around. In calm conditions, you can lighten up your weight for an even more natural, slower fall. The ability to instantly change your fishing depth by sliding that bobber stop makes it incredibly efficient. If you're fishing a deep pond and find the bluegill are holding at 8 feet in the morning, but move to 12 feet in the afternoon, you can adjust in seconds. This flexibility is what makes it superior to a fixed bobber in many scenarios.
Panfish often relate to structure and cover, whether it's a weed line, a submerged brush pile, or a drop-off. A slip bobber allows you to accurately present your bait right next to these fish-holding areas without getting hung up during the cast. Our guide on How to Catch Crappie Around Brush Piles goes into more detail about how fish relate to cover. Remember, the bobber stop is your friend; adjust it regularly based on where you're seeing activity on your fish finder or simply by trial and error. This iterative process of adjusting depth and presentation is key to consistent success. Whether you're targeting bluegill in a small pond or crappie in a large reservoir, the slip bobber will quickly become one of your most trusted tools.
Disclaimer
This article is for general informational purposes only and does not constitute professional advice. Laws, prices and regulations vary by location and change over time. Consult a qualified professional for guidance on your specific situation.